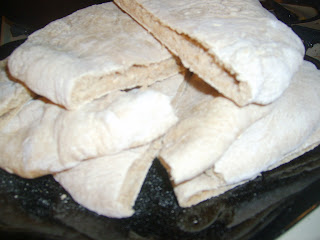
I made these pita pockets the other day for dinner, and my husband said it was a keeper. I only had one that didn't puff up enough for me to cut open, but it was only because I rolled it out too thin. I filled mine with chicken breast that I marinated, cut into cubes, and sauted until done. Then I chopped up tomatoes, bell pepper, and cucumber, green onion, and tossed together with the chicken. I tossed mine with mayo, but my hubby chose to toss his with some lime and garlic dressing, the same that I marinated the chicken with. I think ranch would be the best for the chicken and veggies, but anything will do. Sometimes I just want a nice filling sandwhich for dinner, but these would be great for lunch too! It would be easier to just buy pitas, but making them is fun, plus the whole wheat is a bonus for those who are Insulin Resistant. So here is the recipe, I found this one on about.com. Go to the link to find the original recipe and reviews. I did not have any honey so I just used sugar, and I added more salt, cause it seems to me every time I make bread it is bland to my taste.
Ingredients:
- 2 1/2 cups warm water (110 degrees)
- 1 1/2 teaspoon active dry yeast
- 1 tablespoon honey
- 2 cups wheat flour
- 3 cups all purpose flour
- 1 teaspoon salt
- 1 teaspoon vegetable oil
Preparation:
Dissolve yeast in warm water. Add honey and stir until dissolved. Let sit for 10-15 minutes until water is frothy.Combine white flour, wheat flour, and salt in large bowl.
Make a small depression in the middle of flour and pour yeast water in depression.
Slowly add warm yeast water, and stir with wooden spoon or rubber spatula until dough becomes elastic.
Place dough on floured surface and knead for 10-15 minutes. When the dough is no longer sticky and is smooth and elastic, it has been successfully kneaded.
Coat large bowl with vegetable oil and place dough in bowl. Turn dough upside down so all of the dough is coated with oil. Allow to sit, covered, in a warm place for about 3 hours, or until it has doubled in size.
Once doubled, roll out in a rope, and pinch off 10-12 small pieces. Place balls on floured surface. Let sit covered for 10 minutes. Preheat oven to 500 deg F. and make sure rack is at the very bottom of oven. Be sure to preheat your baking sheet also.
Roll out each ball of dough with a rolling pin into circles. Each should be about 5-6 inches across and 1/4 inch thick.
Bake each circle for 4 minutes until the bread puffs up. Turn over and bake for 2 minutes.
Remove each pita with a spatula from the baking sheet and add additional pitas for baking.
Take spatula and gently push down puff. Immediately place in storage bags.
Storing Pita Bread
Pita bread can be stored for up to a week in a pantry or bread box, and up to a month in the freezer. Be sure to use freezer bags when storing in the freezer.Pita bread dough can also be refrigerated for up to one week in the refrigerator.


1 comments:
I need to get some honey (we're all out) and try this recipe. My kids love pitas!
Thanks for stopping by my blog.
Are you working with a doctor for you PCOS? I have a friend with all kinds of health issues and chemical allergies caused by mold and then carbon monoxide poisoning. There's a chiropractor/nutritionist here in Indy that has helped her tremendously, and he does phone consultations. I'll look up his website (can't remember at the moment) if you'd be interested in looking at it. I have minor chemical sensitivities so I can understand a teeny weeny bit, my friend is also concerned I might have adrenal fatigue, so she's been wanting me to see him about that. Anywho, I'll add you to my prayer list!
Grace and Peace,
Angel
Post a Comment